Customize Business Manager

You can create a custom cartridge to modify existing Business Manager pages and add new ones.
The following four parts of the Business Manager user interface can be extended.
- menu items
- menu actions
- dialog actions
- forms
Each of the four types of extensions provides a different way to hook custom functionality into Business Manager. Because standard Business Manager menus use menu items and menu actions to access business functionality, Business Manager Extensions provided by merchants seamlessly integrate with existing menus.
Business Manager extensions are defined in XML files that are read during server startup. These XML files are placed in cartridges that implement the portions of Business Manager. A B2C Commerce server without customization has only one XML file located in the app_business_manager cartridge. This file contains all the menu items and menu actions you can see in an unaltered Business Manager.
The Business Manager extensions framework takes the list of cartridges
assigned to Sites to collect all XML files from which to load Business Manager
extensions. All Business Manager extensions read from the XML files are merged into a table. The
table contains the Business Manager extensions that are applicable for the current
organization.
Customize Existing Business Manager Functionality
You can customize certain Business Manager functionality by creating a custom cartridge and
modifying specific ISML templates in it. These templates, which override standard Business
Manager templates, exist in folders under /cartridge/templates/default. You
can only customize the Business Manager templates listed here.
| Folder | Customizable Templates |
|---|---|
| /cartridge/templates/default/application |
|
| /cartridge/templates/default/custom |
|
| /cartridge/templates/default/marketing |
|
| /cartridge/templates/default/order |
|
| /cartridge/templates/default/user |
|
For example, a merchant conducts business in a region that uses VAT (Value-Added Tax), and
wants to print legally valid VAT invoices from the Order page. The output of the standard
invoice print function does not qualify. To implement this functionality, customize the
/cartridge/templates/default/order/printorderinvoice.isml template to add
the required information to the output of the Print Invoice
button.
Extend Business Manager
- Set up a custom cartridge.
- Create a file with name
*bm_extensions.xml_in directory/<cartridge_name>/cartridgeof your custom cartridge. - Add the following lines of XML to your file:

- Add the extension to that file.
- Implement the extension you want by implementing B2C Commerce scripts, pipelines, and templates. Place that implementation in your custom cartridge.
- Deploy your custom cartridge to the server.
- Add the cartridge to the cartridge path at .
- Test extensions.
Add a New Menu Item
To add a menu item, for example, Merchants Custom Menu Item:
- Add the following XML in the
<extensions>tag to yourbm_extensions.xmlfile:
- Choose a unique ID for the menu item.
- Place the menu item in the Administration navigation menu by setting the site attribute to false.
- Use the position attribute to place the new menu item in the preferred order in the navigation list. The higher the number, the higher in the list it appears.
- To enhance the menu item, you can assign an image to it; put
the image in directory
/<cartridge_name>/cartridge/static/default/<my-image-directory>. If you want different images for different languages, make sure to have a separate directory for each language. Use the ISO locale of the language as the directory name.
Add a New Menu Action
Menu actions are the bridge between the navigation (menu item) and the business functionality. To link the navigation (menu item) with the business logic:
- Add the following XML inside the
<extensions>tag to yourbm_extensions.xmlfile:
- Supply a unique ID to the menu action.
- Because the parent menu item is hooked into the Administration
section of the navigation, set this site attribute to false.Note: You can't add a menu action under a menu action. It must be below an existing menu item (custom or supplied by Salesforce).
- When selecting a menu action at the Business Manager overview,
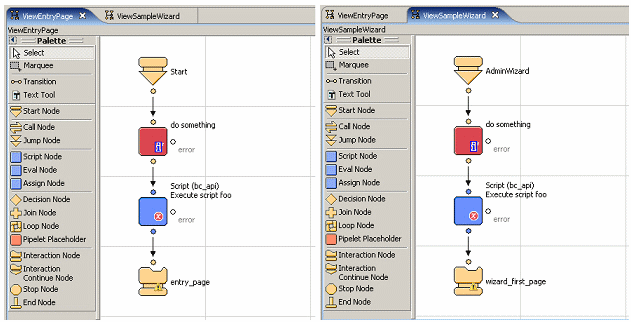
a pipeline is executed to show the first page of your custom business functionality.
Specify the name of that pipeline and start node in the XML element exec:
- List all pipelines that implement your menu action in the menu
action's XML definition. List them inside the <
subpipelines> tag. Use
a separate <
pipeline_ for each pipeline. If only some of a pipeline's
start nodes belong to the menu action, you can restrict it by specifying _name of the
pipeline-Name of the start node.

Note: Always add the exec-pipelines to the < subpipelines> section. Non-public pipelines (where all start nodes have call mode = "Private") need not be added to the < subpipelines> section. - After successfully deploying your cartridge on the server, you can grant permissions on the menu action.
Implement Dialog Actions
Dialog actions hook into existing Business Manager page. The dialog action can open a popup or navigate to a subpage.
- Add your custom dialog to the
bm_extensions.xmlfile:
- Select a unique ID for the dialog action.
- Choose the extension point from the list of available extension
points (to which you want to hook the dialog action). The extension points are listed at the
end of the
bm_extension.xmlfile. - Add this ID as a value of the
xp_refattribute to the XML. - Make sure the tag < exec pipeline=.. contains the name of the pipeline executed when the user clicks the button of the dialog actions hook.
- To open a popup, set the attribute extern to true. Make sure the page to be opened is designed to appear as a popup.
Implement Form Extensions
- Add the form extension to
bm_extensions.xml.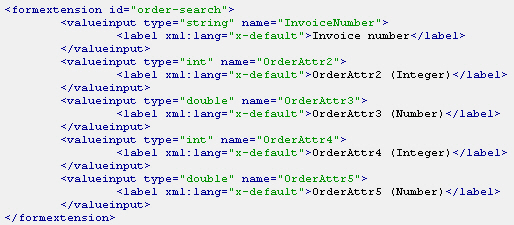
- Choose the ID (into which you want to add the form extension) from the list of available extension points.
- Add this ID to the XML as the attribute ID value. Each
<valueinput> element is rendered as an HTML form input field. The name of the
form field must be unique within your form extension. Each form input field must specify
the type of input data captured by the form field. Available data types are
string,int,double. - Specify a label to appear beside the form field. Specify
the label at least for
x-defaultlocale. Add more < label... elements to localize for other languages.
name
map to the attributes of the business object to search for. For example, if you extend Order
Search, you can view that business object's attributes by selecting .