Salesforce B2C Commerce 24.7 > Developing Your Site > Legacy Developer Documentation > Site Genesis > SGJC Forms > Developing Forms with Pipelines > Salesforce B2C Commerce Forms Components
Form Components Working Together
This topic provides a quick overview, via an example, of how to
use the various Salesforce B2C Commerce forms components to create a simple form. This
example uses a form definition, template and pipeline to receive customer
address data from a browser.
-
Create a form definition
sendAddress
(File > New > File) in the forms directory within your cartridge (Navigator view:Cartridge/forms/default/sendAddress.xml
) using the following elements:Option Description For the... Use... header <?xml version="1.0"?> <form>
name <field formid="name" label="Name" type="string" mandatory="true" missing-error="Your Name is Mandatory"/>
email address <field formid="emailaddress" label="Email Address" type="string" mandatory="true" regexp="^[\w-\.]{1,}\@([\da-zA-Z-]{1,}\.){1,}[\da-zA-Z-]{2,3}$" value-error="Invalid Email Address"/>
message <field formid="message" label="Message" type="string" mandatory="true"/>
send (Action) <action formid="send" valid-form="true"/>
footer </form>
-
Provide a
formid
, formlabel
andtype
. Specify if the field is mandatory and any error conditions and messages. -
Any validation you provide in the form definition is
performed automatically by the Forms Framework. For example, all the
previous fields have the mandatory attribute set to "true". The
name
field includes a defined message if the form is submitted without a name value. - Make sure you give the file name an XML extension.
-
Use a regular expression (see the
emailaddress
field) to validate a field. If the field doesn't meet the regexp requirements, the form fails validation. -
An
<
action>
element'sformid
is the name of the action when the form is submitted. This name is used in the pipeline to determine on which path the processing will continue. For validation to be performed, you must set it tovalid-form="true"
. If you don't, the Forms Framework lets the form continue with invalid data. -
Enter (or cut and paste) the following:
<?xml version="1.0"?> <form> <field formid="name" label="Name" type="string" mandatory="true" missing-error="Your Name is Mandatory"/> <field formid="emailaddress" label="Email Address" type="string" mandatory="true" regexp="^[\w-\.]{1,}\@([\da-zA-Z-]{1,}\.){1,}[\da-zA-Z-]{2,3}$" value-error="Invalid Email Address"/> <field formid="message" label="Message" type="string" mandatory="true"/> <action formid="send" valid-form="true"/> </form>
This example uses hard-coded strings for the messages, for simplicity and clarity. A more efficient way to do this is to define all messages as resource properties (similar to using a ResourceBundle in Java). See localization documentation. -
Create a template
sendAddress
to render the form (File > New > ISML Template) in the templates directory within your cartridge (Navigator view:Cartridge/templates/default/sendAddress.isml
), as follows:-
Include the modules template because it processes all input
from the
<
isinputfield>
tag.<
isinclude template="util/modules">
-
Access the
sendAddress
form instance in the Pipeline Dictionary.<
form action="${URLUtils.httpsContinue()}" method="post" id="${pdict.CurrentForms.sendAddress.htmlName}">
-
Start a table.
<
table border="0">
-
Define the
name
input field to be stored in the Pipeline Dictionary.<tr> <isinputfield formfield="${pdict.CurrentForms.simpleform.name}" value="${pdict.CurrentForms.sendAddress.name.htmlValue}" type="input"> </tr>
-
Create an input field
simpleform.emailaddress
for browser input.<tr> <isinputfield formfield="${pdict.CurrentForms.simpleform.emailaddress}" value="${pdict.CurrentForms.sendAddressβ.emailaddress.htmlValue}" type="input"> </tr>
-
Create an input field
simpleform.sendAddress
for browser input.<tr> <isinputfield formfield="${pdict.CurrentForms.sendAddress.message}" type="textarea" attribute1="rows" attribute2="cols" value1="6" value2="50"> </tr>
-
End the table.
</table>
-
Define the
Send
action for browser input.<input class="image imageright" type="image" src="${URLUtils.staticURL('/images/cont_bttn.gif')}" value="Send" name="${pdict.CurrentForms.sendAddress.send.htmlName}" />
-
End the form definition.
<
/form>
Make sure you give the file name an ISML extension. Also, make this a valid ISML file by including the previous lines within the
The system renders the fields using the<
html><body>
tags, or include it as part of an existing template.<
isinputfield>
ISML tag; while the Framework handles all the validation and rendering of any messages that are defined in the form definition file.
-
Include the modules template because it processes all input
from the
-
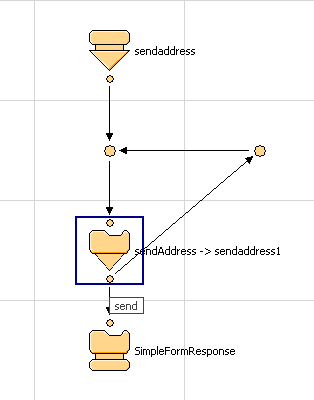
The template is called by an interaction continue node
either in an existing pipeline or a new pipeline or subpipeline. For
the previous example, create a new pipeline with a Start Node, an
Interaction Continue Node (to load the template and form definition
and process the action) and an Interaction Node to render the response
data from the form, shown in the following graphic.
-
From the interaction continue node to the interaction node you
must use a named transition, in this example, send. You will
also need a
next
transition off the interaction continue node to render error messages if the user doesn't enter data correctly into the fields. In this case, it returns to the interaction continue node. - Create a simple template that provides a simple response to click the send button (called SimpleFormResponse).
-
When the customer clicks the send button (the send action
that is named in the transition), B2C Commerce performs a
validation. The Interaction Continue Node handles where the actions
are routed to, so always use this node when working with forms.
- If the form passes the validation configured in the forms
definition, the action is set to
send,
and in the case of this pipeline, another template is rendered, showing the posted data from the form. - If form validation finds an issue, the action is set to next. The next action causes the form to be reloaded with any error defined messages rendered to the user. For example, an incorrect email address causes the form validation to fail, and the next action is fired.
- If the form passes the validation configured in the forms
definition, the action is set to
-
If you create this sample application and either run it alone, or
add it (temporarily) to an existing application, you should see the
following:
-
When you click the Continuebutton, you should see the
following:
If you encounter errors, check if your node names are the same in the pipeline. Each node name must be unique. For example, you can't call both the Start node and the interaction continue nodesendaddress.
Were you able to get your original application running? For example, get the SiteGenesis application running before you attempt this sample application.
Infocenter Retirement: On June 30, 2023, the Infocenter was retired, and documentation currently hosted on the Infocenter will be published to Salesforce Help, Commerce Cloud Developer Center, and Salesforce B2C Commerce Developer Documentation Resources. For more information, see the release note.