Code Deployment
When you have finished development in your sandbox, you use UX Studio to upload your code to the sandbox instance.
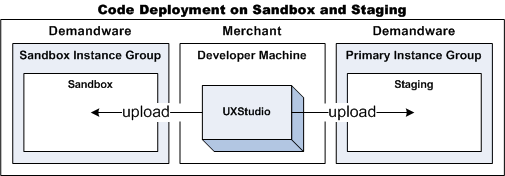
You can deploy code from UX Studio directly to your Sandbox instance, via your server connection.
- On the Studio toolbar, click B2C Commerce Server and select a connection, and then select Upload Cartridges.
See Configuring Your B2C Commerce Server Connection and Troubleshooting Your Server Connection for information on configuring auto upload. For best practice information on code deployment, see General Deployment and Replication Details.
Code Versions and the Active Version
B2C Commerce lets you have multiple custom code
versions uploaded to the system at the same time. The code is arranged in
a top-level directory, called Version Directories. You can name
each directory in accordance with your versions, for example, v12
or summer_release.
When developing your storefront, you select one active code version with which to work. Select Administration > Site Development > Code Deployment. Select a version directory as the active version for a site. All templates, pipelines, scripts and images are taken from this active version. Studio also connects to this version.
B2C Commerce automatically and asynchronously removes the oldest code versions on all instance types. The active code version and the previously active code version are not included in this process. You can configure the number of retained code version.
You can rollback your storefront to a previous version if necessary; and develop your application with a newer version while maintaining an active storefront on a stable code base.
B2C Commerce no longer lets you upload code using a .zip file containing a distinct code version. Instead, you must upload your cartridge. Most development teams have a regular method for uploading code to staging.
-
In Studio, right-click your B2C Commerce Server and select B2C Commerce Server > Change Upload Staging Directory.
The Change Upload Staging Directory dialog box appears.
-
In the Target version directory list, select the active version.
Troubleshooting Tip for Code Versioning
Technical Page There were technical problems while the request was being processed!
Executed Request:
Default Technical Details: System template default used directly or indirectly in custom site
However, you can also upload a cartridge to the correct version in Studio, usually to your Sandbox.
Code Uploads to an Active/Inactive Version
Best practice is to upload code into an inactive version on a Staging instance and subsequently replicate the code to a Development or Production instance.
Code uploads into an active version are only allowed on Staging, Development, and Sandbox instances. Production instances reject WebDAV based code uploads that occur directly into the currently active version. Code uploads onto a Production instance can only be to an inactive version.
Code Compatibility Mode
You can also specify the active compatibility mode (API version). B2C Commerce lets you activate a new compatibility mode or revert to the previously active compatibility mode.
You can replicate code to another system. Code Replication transports the active code version from the staging instance to the target production or development instance.
Compatibility Mode is interchangeable
with the term API Version.