Configuring Studio Views
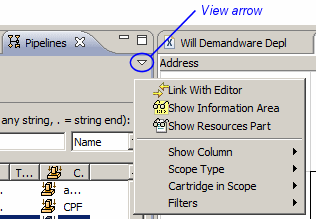
You can configure views to show elements based on filter settings. Click the down-arrow in the upper right corner of a view to access these settings.

The settings are as follows:
| Setting | Description |
|---|---|
| Link With Editor | The navigational view links to the editing view, which helps you keep track of what you are working on. The default is unchecked. |
| Show Information Area | The Information Area (pane) appears below the navigational pane. The default is unchecked. |
| Show Resource Part | A Resources pane appears below the navigational pane, showing the element's path. The default is unchecked. |
| Show Column | You can select the columns that appear in the navigational pane. The default is that all of them appear. |
| Scope Type |
You can specify the cartridges you want to view.
|
| Cartridge in Scope | You can select one of the cartridges that are available to you, thus helping you focus on a particular area. |
| Filters | You can specify the following filters:
|
Shortcuts
You can also use these shortcut icons (not all of these icons appear in every view):
| Icon | Use to . . . |
|---|---|
|
|
Refresh selected items |
|
|
Show the property of the selected item in the Property view. |
|
|
Link the selected object with the Editor area. |
|
|
Toggle between showing the information area and hiding it. |

|
Toggle between showing resources view and hiding it. |
|
|
Collapse the navigation tree. |
|
|
Show the entire tree, with the current selection highlighted in place. |
|
|
Reset the root back to the original root, with that root highlighted. |
|
|
Set the current selection as root and shows the tree beneath it. |