Apple Pay Button Injection
You can use several different methods to inject the Apple Pay button into the storefront.
The Apple Pay button can be either:
- automatically injected in the storefront via configuration
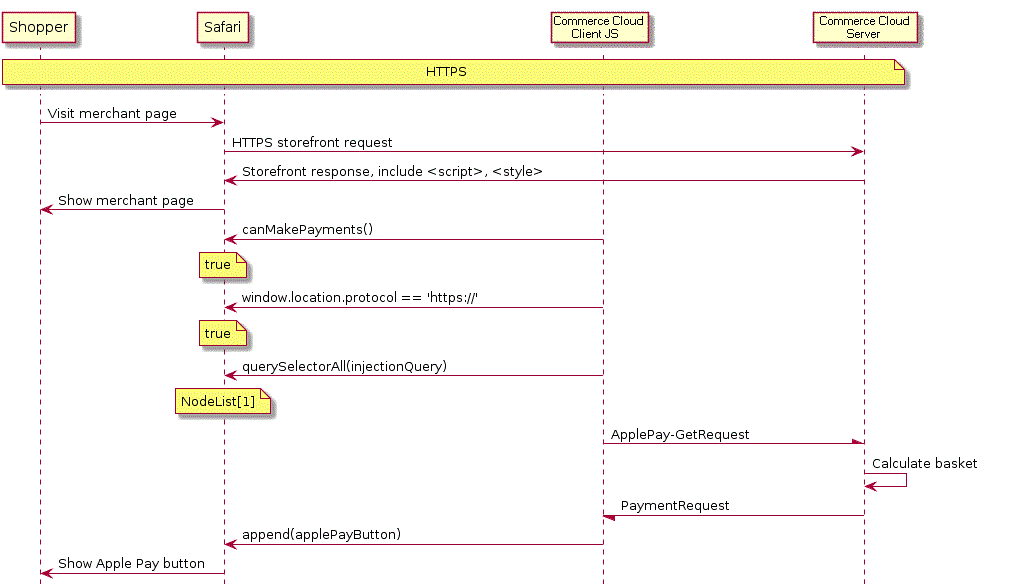
When the shopper's browser supports Apple Pay and there is a place in the page for a button to be injected, Salesforce B2C Commerce determines if it's appropriate to inject the button. If so, iB2C Commerce inserts the Apple Pay button on the page.
- injected manually by a storefront developer
B2C Commerce supports customization of the storefront presentation of the controls to initiate payment via Apple Pay. This customization includes not only where the button appears, but also how the button should look, and if a product is to be added to the basket before checkout commences.
The Apple Pay button is injected when:
- The browser supports Apple Pay payment
- The page contains configured places to show an Apple Pay button
- The customer basket and additional information from the B2C Commerce server indicate that Apple Pay payment is supported
The Apple Pay button should never be unavailable. The web page should prompt the user to provide the additional information if the user taps the button without completing their input selection. That prompt should guide the user to the part of the form that requires completion. For details, you should review the Apple Human Interface Guidelines and success stories to design your UI and UX for Apple Pay on the web.
A new tag ( <isapplepay> ) is added to ISML to inject an Apple Pay control in the HTML page supports optional attributes to:
- add the product to the basket
- specify the look of the button, among possible choices
- specify the ID of the element
The <isapplepay> tag must have a closing tag.
If there are already items in the shopper's basket and they click the Apple Pay button for an individual product, the items currently in the basket are stored temporarily during the purchase of the individual item; the original items are then restored to the basket.
There are two places where a button can be injected via configuration:
- Cart
- Mini Cart
Each is represented by a CSS selector plus additional information about how to inject. The CSS selectors are based on SiteGenesis DOM and CSS class names, but can work on sites other than SiteGenesis.
If a site is configured to inject, one of these selectors finds a match, and the __SYSTEM__ApplePay-GetRequest pipeline responds with a valid JSON for an ApplePaySession payment request, the button is injected. These buttons check out the current basket (as opposed to buttons to buy a single specific product) so the basket must not be empty to inject the button.
For Cart, the Apple Pay button is injected after “button[name=dwfrm_cart_checkoutCart]” and its margin and width are copied for Apple Pay UI guidelines reasons. The CSS classes “dw-apple-pay-button” and “dw-apple-pay-cart” are put on the injected button, and (if necessary) a CSS class corresponding to the configured button style.
For MiniCart Commerce Cloud appends to “.mini-cart-totals”. Margin, width, or any other attributes are not copied. Commerce Cloud puts “dw-apple-pay-button” and “dw-apple-pay-mini-cart” plus configured style CSS classes. Not all sites support automatic injection, and sites that do support automatic injection might find they don’t like the way the button is automatically injected. In that case, a customer developer should choose where to inject by using <isapplepay></isapplepay> in their templates.
The process of injecting the Apple Pay button is as follows:
